


Access Barrier Kit User Guide

The
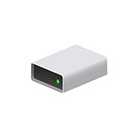
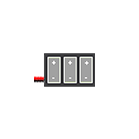
Access Barrier Kit uses a servo motor to lift up/down the barrier bar and is programmable using an Arduino microcontroller or BBC Micro:bit. The bar has two LEDs (Red and Blue) which can be individually controlled. The kit is designed to plug into a breadboard.
In the guide below we will walk you through the steps to assemble this Access Barrier Kit and to control the barrier bar and LEDs using Arduino and Micro:bit.
The sample code used in this guide is available here . Recommended Tools Small philips head screwdriver and plier.
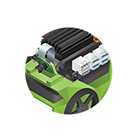
Assembly Guide Attach the servo motor to the base plate
Secure the servo motor to the base plate using two M2 screws and nuts.
Place the servo in the manner as shown below, with the servo...
SGBotic Ultimate SR04 RGB Ultrasonic Sensor - User Guide
SGBotic Ultimate SR04 RGB Ultrasonic Sensor uses dedicated microcontroller for I2C interface, RGB control and ultrasonic ranging. Although this sensor is based on the design of the popular HC-SR04, its operation and interfacing are completely different.
This user guide will walk you through the technical aspect of the sensor. We have written a library / extensions and example codes for Arduino board and Micro:bit. If you're using these controller boards, you can head over to the respective tutorial.
Pinout
The Ultimate SR04 RGB uses I2C interface to send and receive data. Only two data pins are required to connect single or multiple units of this sensor to the host controller.
I2C Registers
The Ultimate SR04 RGB has 10...
Ultimate SR04 RGB Ultrasonic Sensor - Arduino Tutorial
This tutorial covers the
SGBotic Ultimate SR04 RGB Ultrasonic Sensor ' Arduino library and the wiring of the sensor to the Arduino board. While the example codes can be applied to Arduino Uno, ESP32 and ESP8266, the wiring is based on the Arduino Uno board.
You need to install our Ultimate SR04 RGB library to your Arduino IDE in order to run the sketch. You can head over to our
github repositories to download your copy. If you're not sure on how to install the library, you may refer to this link for instructions.
All the example codes in this tutorial can be found in the "examples" folder in our library.
You may refer to our
User Guide for technical details of the sensor:
Wiring
Connect your Ultimate SR04 RGB to the Arduino Uno...
Ultimate SR04 RGB Ultrasonic Sensor - Micro:bit Tutorial
This tutorial covers the
SGBotic Ultimate SR04 RGB Ultrasonic Sensor ' Micro:bit extensions and the wiring of the sensor to the Micro:bit board.
You will require an expansion board to access the I2C pin on the Micro:bit board.
All the example codes in this tutorial can be found in the "examples" folder in
our github repository .
You may refer to our User Guide for technical details of the sensor:
Installing Ultimate SR04 RGB Extensions
The Ultimate SR04 RGB comes with a MakeCode extensions that helps to simplify programming.
To install or add this extensions to your MakeCode editor, click on "Advanced" >> "Add Extensions" in the blocks category.
User the keyword "sgbotic" to search for the extension:...
vRTCam User Guide
he
vRTCam from SGBotic is designed for use with a mobile phone as remote controller with minimum setup. It turns the web browser on your mobile phone into a remote controller. No installation of Apps is required. The vRTCam will function as a wireless access point upon powered up, and uses wifi to link to your mobile phone. Each vRTCam has a unique SSID to allow multiple units to operate in close proximity.
This user guide will walk you through the technical aspect of the vRTCam. For application of this module, refer to our
step-by-step guide in creating a two-wheels rover using vRTCam . The guide covers hardware assembly, wiring and Arduino programming.
Overview & Pinout
Arduino Library & Sample Code
We have written an Arduino...
Line Follower Array IR Sensor Calibration
The SGBotic Line Follower Array gives your robot the ability to follow a dark line on a white background or vice-versa. This calibrating guide will walk you through the steps in calibrating the IR sensors on the array. Each IR sensor has a LED which turns on when the sensor detects reflected IR light, and a potentiometer for adjusting detecting sensibility. 1. Power the Line Follower Array with 3V or 5V supply. 2. Turn the potentiometer counter-clockwise all the way until you hit a stop. 3. Place a piece of white paper above the IR sensor and turn the potentiometer slowly clockwise until the LED lights up. The height of the paper should be close to your array mounting heights. 4. At this point the IR sensor is calibrated to your desired sensing height. The LED...
HX1230 Graphic LCD Wiring Guide
The
HX1230 LCD is a basic graphic LCD screen originally intended for as a cell phone screen. It uses the HX1230 controller to drive a graphic display of 68 rows and 96 columns.
In the guide below we will walk you through the steps to install u8g2 library to Arduino IDE and to interface this LCD to
Arduino Uno , ESP32 and STM32F103C8T6 Microcontrollers.
Install u8g2 library
In Arduino IDE, go to
Sketch > Include Library, select Manage Libraries
Search for
u8g2 , select latest version and click on Install button
Sample sketch
In Arduino IDE, go to
Files > Examples > U8g2 > full_buffer . Click on GraphicTest
Arduino Uno
Copy and paste the Constructor...
128×64 Monochrome Graphic LCD Display Wiring Guide
The
128×64 Monochrome Graphic LCD Display (
3.3V or 5V ) is a 128 x 64 pixels LCD screen with 4-wire SPI interface.
In the guide below we will walk you through the steps to install u8g2 library to Arduino IDE and to interface this LCD to
Arduino Uno and ESP32 Microcontrollers.
Install u8g2 library
In Arduino IDE, go to
Sketch > Include Library, select Manage Libraries
Search for
u8g2 , select latest version and click on Install button
Sample sketch
In Arduino IDE, go to
Files > Examples > U8g2 > full_buffer . Click on GraphicTest
Arduino Uno (use 5V version)
Copy and paste the Constructor below to
your
GraphicTest sketch (place the...
Program STM32 Blue Pill (STM32F103C8T6) with Arduino IDE
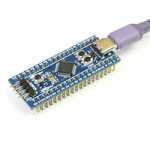
STM32 Blue Pill is a feature-rich development board based on STM32F103C8T6 processor - a 32-bit ARM Cortex M3 processor running at 72MHz frequency. Unlike the common Arduino board which is easy to use, programming the STM32 Blue Pill can be confusing especially for a new user.
There are several ways to program the STM32 Blue Pill with Arduino IDE - some require external hardware, others just need an USB cable. In the following guide, we will cover three common methods of downloading the sketch in Arduino IDE:
Arduino HID bootloader
ST-Link compatible emulator and programmer
USB to 3.3V TTL adapter
So roll up our sleeves and get started.
Download and install Arduino IDE
The first thing you need to do is to download and install...
